After outlining our first 15 Gaelic football drills for the U6 age level, we have decided to do a second post to outline 15 more Gaelic Football drills for U6’s, so that you will have more of a variety when it comes to managing your own underage teams. In this second post, we have outlined 3 more warm up drills and 12 more station drills for smaller groups which we hope you can follow and implement in your own training sessions.
Some of these will work better than others so feel free to pick and choose which ones you think will work best for you. Alternatively, you can take another look at our first set of 15 drills here which we hope you also found useful in some small way. For easier navigation, this post will be outlined and split up as follows…
Read also: Our equipment resource list to support Gaelic drills here
Gaelic Football Drills for U6 Part 2 Content:
- Section 1: Warm up drills – 3 Further Options
- Section 2: Smaller group station drills – 12 Further Options
- Section 3: Match games to finish up
Read also: Part 1 of our Gaelic Football drills for U6’s here
Section 1: Warm up drills – 3 Options
Warm up Drill Option 1 – Rolling & Bouncing Relay
Drill Instructions:
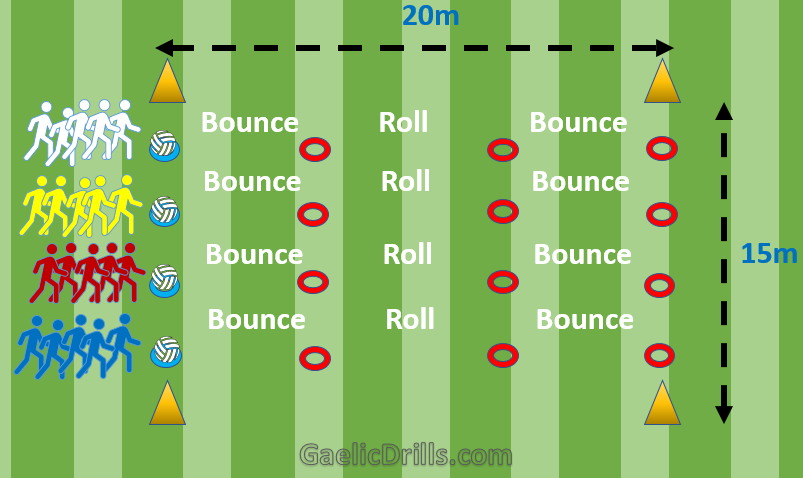
- Mark out a larger area with cones of 20m by 20m or 20m by 15m and then split them into relay groups of 5 or 6
- This fun exercise will help them to get familiar with handling the ball, rolling it, picking it up, bouncing and catching the ball bounce
- Emphasis should be placed on the catch from the bounce to bring the ball safe and secure into the tummy region.
- For the first cone, they bounce the ball, then when they reach the 2nd bounce they have to roll it to the next cone and practice the pick up skill.
- Once picked up, they practice bouncing the ball once again and return the same way as they went out.
- Where possible, do a single-handed bounce, a double handed bounce and a proper ball pick up.
Warm up Drill Option 2 – Ball Racing
Drill Instructions:
- The purpose of this drill is to get them accustomed to running with the ball at pace and being able to control it when they are at full tilt
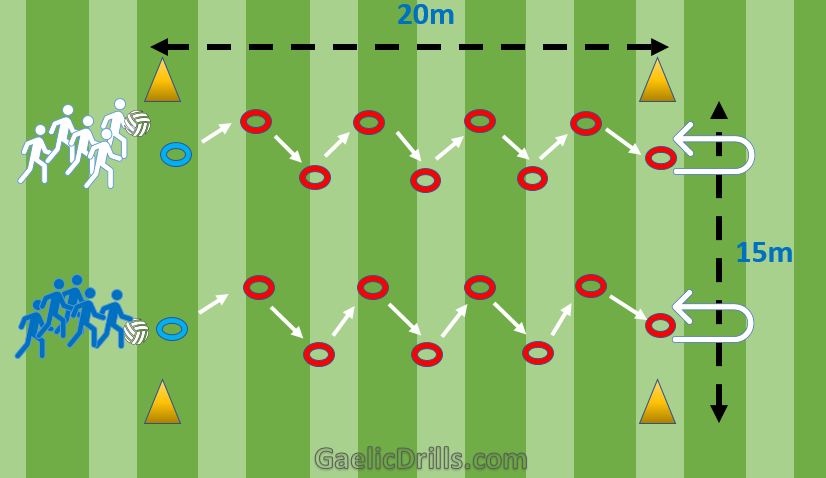
- Starting off, no bouncing of the ball is needed – this is a relay race with the ball in hand and they have to zig zag through all the cones as outlined in the diagram above.
- This will help get them accustomed to jumping from the left foot and racing to the right and vice versa jumping from the right foot and sprinting to the left.
- Once they reach the furthest cone, then it’s a straight race back to the next team member where the ball needs to be passed - thrown or an actual hand-pass if possible.
- Members must wait at their cone for the pass and cannot start racing until the ball is in hand.
Warm up Drill Option 3 – Ball Balancing & Knocking
Drill Instructions:
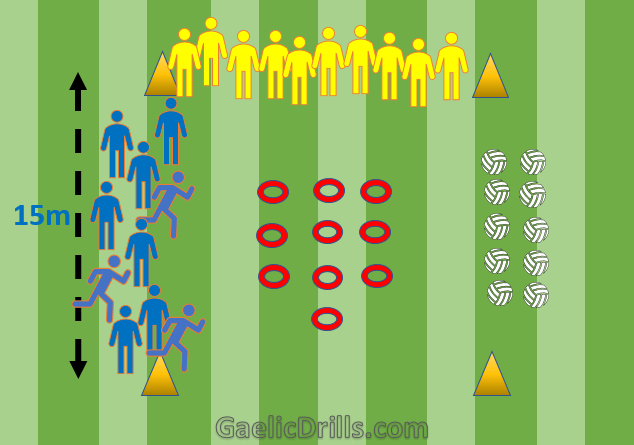
- To get everyone on the panel involved, split them into 2 groups – ideally 10 to 12 or even 15 each.
- For this exercise, you have the first group called the Balancers and the second group called the knockers.
- Line the balancers on once side of the square, the knockers on another side of the square and place 10 marker cones in the centre of the area.
- Place the 10 footballs at the other side and once the coach blows the whistle, the balancers must race to the balls and balance them all on the cones within 10 or 20 seconds.
- Once all balanced, the coach blows the whistle for the knockers to knock them off the cones – points are awarded to those who can knock off the most.
- Alternate between the balancers and the knockers after 5 minutes or so.
Read also: Our equipment list for Gaelic drills here
Section 2: Smaller group station drills for U6– 12 Further Options
As before, make sure to split the large group into smaller groups here of around 6 to 10 children per group. Also try to have 2 mentors for each group to ensure these drills are carried out correctly and rotate through the drills every 8 to 10 minutes on average.
Drill Station Option 1 – Punt Kicking
Drill Instructions:
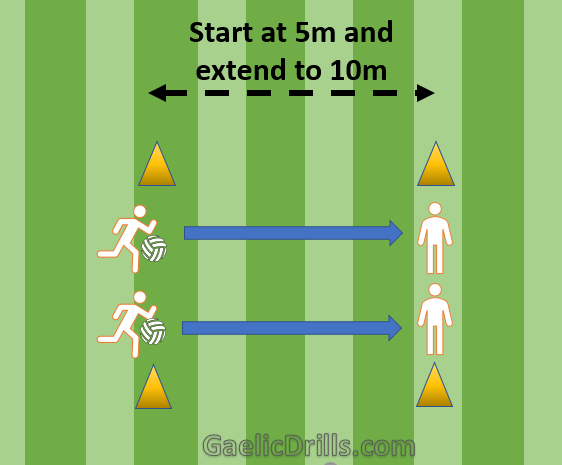
- Organise the smaller group into pairs and match them up as best you can in terms of size and ability
- Start with a spacing of 5m and then extend to 10m after a few minutes. If the ability is higher, then this can be extended out to even 15m
- Get them to focus on the concept of a punt kick with letting the ball fall on the foot to be kicked rather than throwing the ball up in the air.
- Toes should be pointed out, knees bent and show how the ball should be dropped and kicked in a straight line.
- If the balls are too big for their hands, use a 2 handed drop or if they can handle it, use a right drop for a right foot kick and vice versa
Drill Station Option 2 – Coach Catching
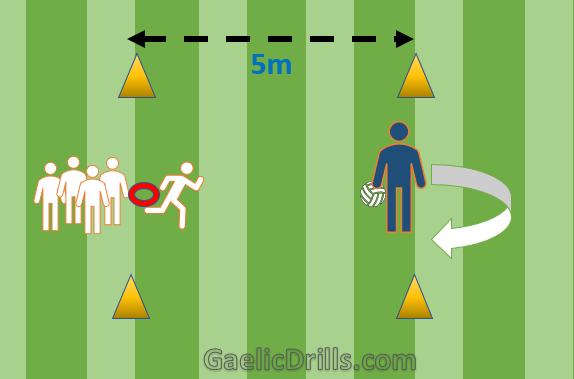
Drill Instruction:
- For this drill, the coach or mentor needs to play a significant part in that they will be throwing the ball for the children to catch.
- The ball is thrown in the air for the players to catch and then they bounce the ball around them and return to the group. When they have returned, they pass the ball back to the coach and then they return to the end of the line
- The coach can vary the types of throws here be it a high catch, a tummy catch, a low catch or even a rolling pick up.
- Change the type of the throw each time so that it is varied and unpredictable and even throw it slightly left or slightly right to make them work for it
Drill Station Option 3 – Semi Circle Hand Passing
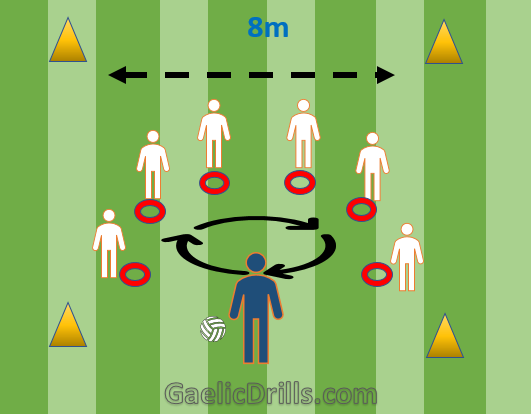
Drill Instructions:
- For this drill set up an area approx. 8m by 8m and then set up a semi-circle using space marker cones. 5 or 7 space marker cones will suffice and make sure they are spread out evenly.
- The mentor stands in the centre of the semi-circle and passes it to the left to the first member who in turn passes it to the next member and so on until the ball reaches the coach once again.
- This can be varied from clockwise to anti-clockwise during the middle of the passing by using your whistle, so the players know immediately that they need to change direction.
- Once the confidence of passing and catching has improved, then introduce a second ball and even a third ball so that they need to look both ways at all times when the next ball is coming left or right.
Drill Station Option 4 – Pass & Corner Runs
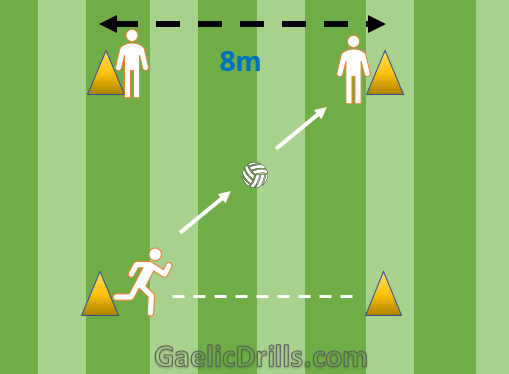
Drill Instruction:
- This drill is for smaller groups of 3 children and set up a small square around 8m wide as outlined in the diagram above.
- The purpose of this drill is to get them to run at speed to an empty corner once they have passed the ball to another team member.
- Once the ball is kicked again, then the automatic reaction is to find an empty corner and sprint as fast as they can to it.
- The ball can be passed along the ground or a knee punt or a kick punt if they are capable. If they are struggling with the kick passing, then a throw pass or hand pass will suffice, or they can take a bounce to get closer for the pass to be completed.
- Again, the main objective here is to get them to move at pace once the pass is completed.
Read also: Our list of equipment to support Gaelic drills here
Drill Station Option 5 – Kick to Coach & Catch
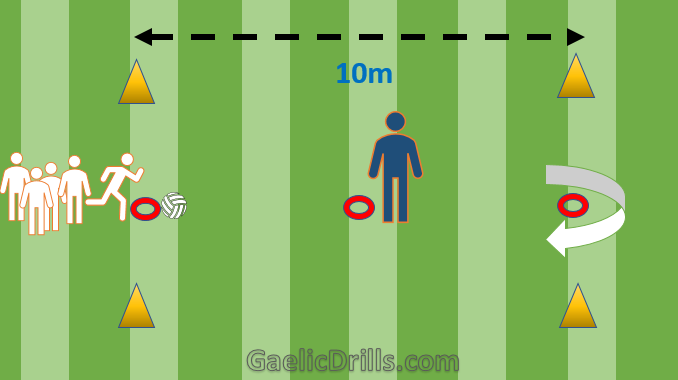
Drill Instructions:
- For this drill, they will get the opportunity to practice giving an accurate kick pass to the coach and the kick pass can be taken as either a ground kick or a punt kick
- They kick the ball to the coach who is positioned at the centre cone, the coach then collects and hand passes it back to them for the child to practice catching the ball.
- This hand pass can be to the left or the right, so the child needs to watch the movement of the coach while keeping their eye on the ball at the same time.
- Once they take the pass, they need to bounce it to the next cone and then jog all the way back to the start to hand pass to the next member
Drill Station Option 6 – Kicking Rounders
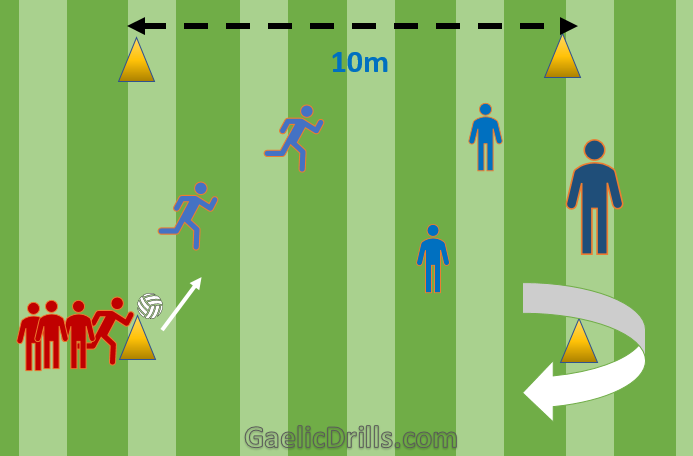
Drill Instruction:
- Up next for you to try out is a game of kicking rounders where the teams try to get around the cone as many times as they can before the ball is returned to the coach.
- The first member on the red team kick the ball as hard as they can into the blue team territory and starts to race around the cones.
- The blue team need to take 3 passes among them and then race to the coach with the ball. Once the ball is in the coach’s hand, then he blows the whistle for the red team member to stop.
- Keep a tally of how many loop rounders each of the red team can get and then alternate both the red and blue teams once everyone gets a run
Drill Station Option 7 – Running Kicks
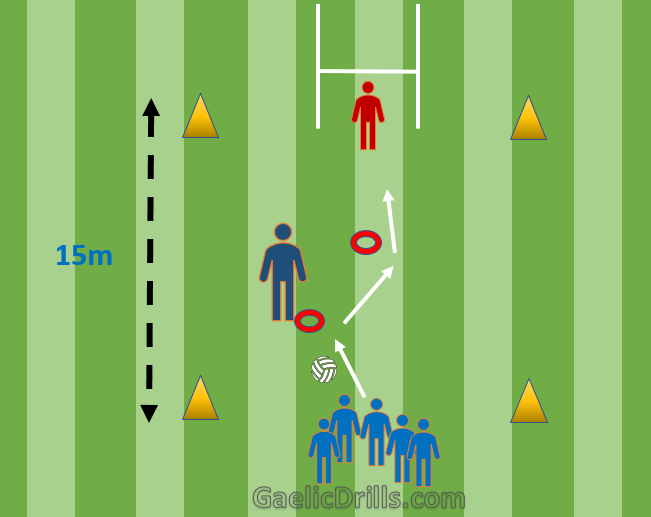
Drill Instructions:
- The objective for this particular drill is to get them to practice kicking the ball while they are running at the same time. Children can use a ground kick or a punt kick as long as the kick is completed on the run.
- They start off with a bounce and then hand pass or throw the ball to the coach, the coach gives a return pass and then the child needs to take a shot on goals while running.
- The child that kicks the ball must retrieve the ball and bring it back to the start position once again.
- Change the keeper around every few minutes and ask them to use their weaker foot also during this session.
Drill Station Option 8 – Triangle Passing
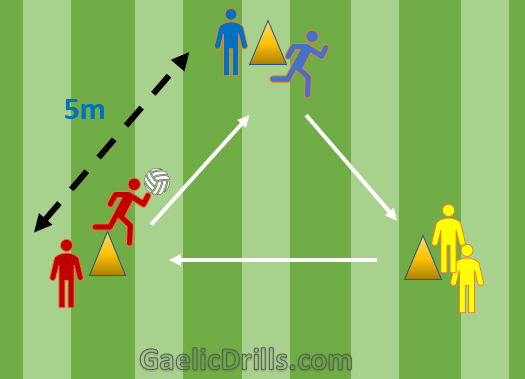
Drill Instruction:
- Set up a small triangle where the cones are approx. 5m apart and have 2 to 3 members set up at each station.
- For this simple drill, the objective is to get them accustomed to hand passing on the run – children can throw pass also if needed.
- The first child jogs and passes it to the next station and waits at that station for the ball to come around again.
- Start in a clockwise direction and then change around to anti-clockwise direction after a few minutes. The instruction is that they run to the point in which they passed the ball to.
- Also try to introduce hand passing with the weaker hand during this drill
Read also: Our equipment page to support Gaelic football drills here
Drill Station Option 9 – Piggy Middles
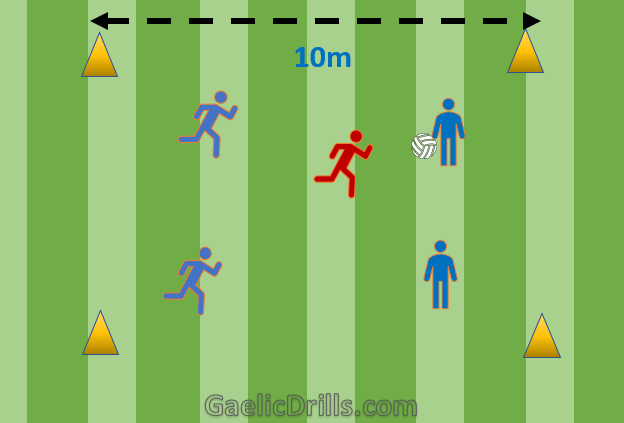
Drill Instructions:
- Another fun game for them to enjoy is piggy in the middle which they will already be accustomed to.
- Start off with groups of 5 and have one versus 4 and then change it to 2 versus 3 after a few minutes.
- Alternate the piggy’s in the middle also after a few minutes and encourage them to move left and right to ensure they can give the hand pass or throw directly to their teammates.
- This drill will help them to be aware of the space they need to get into to collect a pass and also it helps them to practice catching the ball.
- Keep track of the number of scores and give a target of 5 catches to be completed without being intercepted.
Drill Station Option 10 – Ball Ladders
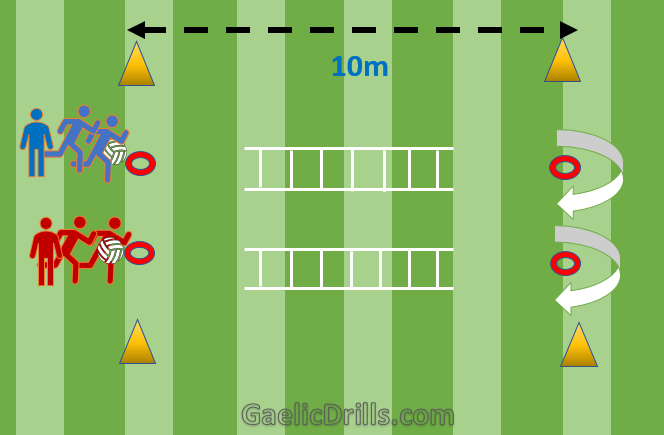
Drill Instruction:
- For this drill, you will need 2 fitness agility ladders which most clubs will have in stock – otherwise check out our equipment resource page link below
- Split them into small groups of 3 or 4 and position them behind the cones in a straight line.
- Once the coach blows the whistle, the players need to step into each individual ladder spacing and they must also take 2 bounces while they are taking their steps.
- When the confidence grows, then start with a hand pass to the mentor after the 2 bounces. This drill will help with feet coordination while also bouncing and catching at the same time
- Start off with a walk and then progress to a jog once their confidence levels grow.
Drill Station Option 11 – Multiple Shooting
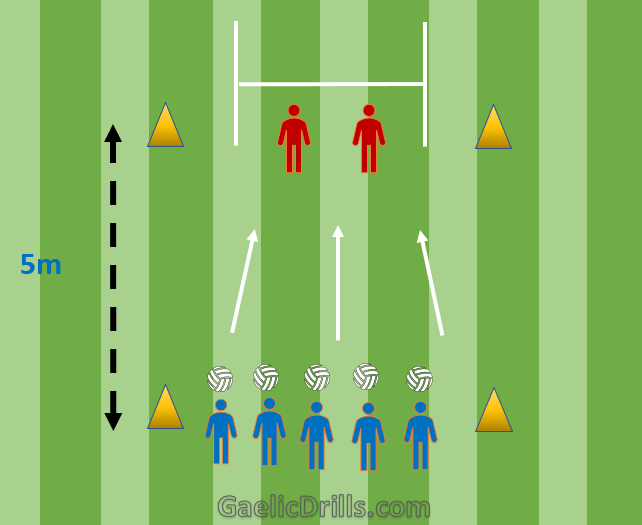
Drill Instructions:
- For this fun drill, you will need to set up a larger goal using long white poles or use a standard goal post at the end of the pitch.
- This time you have 2 keepers in the goals at all times and 4 to 5 players can take shots at random trying to score as many goals as they possible can.
- The child that kicks the ball must retrieve the ball for another member then to kick it.
- The football kicks can start off as ground kicks and then progress to punt kicks when the confidence levels start to grow.
- Alternate the goal keepers after a few minutes and encourage the children to use their weaker foot also. Also get the children to kick from the centre, the right side and also the left-hand side
Drill Station Option 12 – Criss-Cross Passing
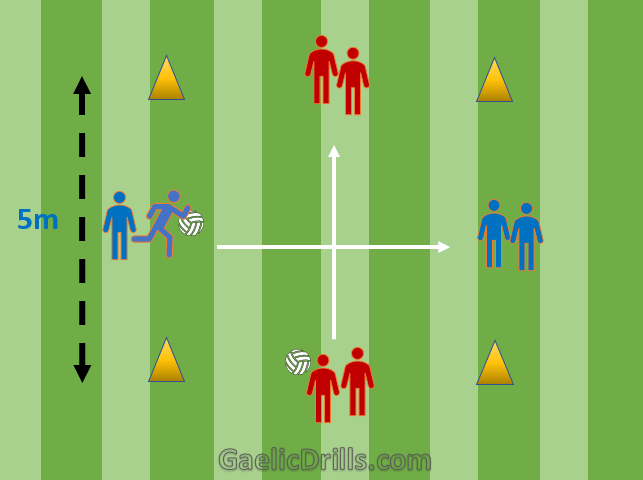
Drill Instruction:
- The next drill for U6 that you can try out is the Criss cross passing that children enjoy.
- The kids run across the path of the other team and hand pass or throw the ball to the opposite member in blue.
- Start off with a quick walk and then progress to a jog once they get the hang of it.
- The children must also bounce the ball once as they are moving across to their opposite team members. Points can be awarded for the number of successful passes and catches they can manage.
- After a few minutes, you can alternate the hand pass or throw pass to a rolling pass to assist in the skill of ball pickups.
- Emphasis should be placed on accurate passing, avoiding the cross runner and catching the ball into their tummies.
Read also: Equipment and resources to support Gaelic football drills here
Section 3: Match games to finish up
For the last 20 minutes or so, you should organise match play so that everyone will get a fair share of the ball so try to have them set up as a five a side or an 8 a side game. Ideally 4 teams should be set up for 2 games at the same time and after 10 minutes, switch around the teams so that they can play against other members or friends within the large group. After the warm-up drills, station drills and the match games are played, you should have more than enough to cover your 60 minute or more training session.
Educate others in the Community
How about you – did you find this second set of Gaelic football drills for U6 useful or helpful in any way? Are there other drills that you believe work better for your own groups that you would recommend instead?
If possible – please share your own suggestions or feedback in the comment box section provided below – so that others across the Gaelic Football community can learn also! (email addresses are not published)


Visitor Feedback