After outlining a series of Gaelic football drills for the U6 age level, we now have a series of U8 and U10 Gaelic football drills which we hope you will like and benefit you, your mentoring team and most importantly your underage Gaelic football panels. Similar to other age groups, we suggest setting up the session as a 10-minute warm up, a 25 to 30-minute duration for station drills and then finish up with competitive games for the last 25 to 30 minutes.
Prior to the session, set up your plan well in advance and have 4 to 5 mini station drills planned and set up for the smaller groups immediately after the warm-up. For the games, try to split the large group into 4 teams and play 2 games at the same time and then rotate the teams after 10 minutes or so. For easier navigation, this list will be outlined in 3 different parts so feel free to skip to whatever part interests you the most.
Read also: Our equipment list to support Gaelic football drills here
U8 & U10 Gaelic Football Drill Content:
- Section 1: Warm up drills – 5 options
- Section 2: Mini Station drills for smaller groups – 10 options
- Section 3: Match play planning
Read also: Our U6 Gaelic Football Drill list here
Section1: U8 & U10 Warm Up Drills x 5 Options
Warm up Drill Option 1 – Movement Instructions
Drill Instructions:
- For an easy way to get them all warmed up, you can get them all organised into a square marked with 4 large cones of approx. 20m by 20m.
- All the children will need to follow various movement instructions from the coach which can be to run, freeze stop, hop like a frog, touch the ground, knees on the ground, heel flips, jump in jacks or touch your toes and high knees with a large step out.
- Other instructions you can use for them to follow is to walk side to side, run side to side, walk backwards and jog backwards.
- Another warm-up drill can be used with this if you need something to get them focused for the first 5 to 8 minutes of a training session.
Warm up Drill Option 2 – Frogs and Flies
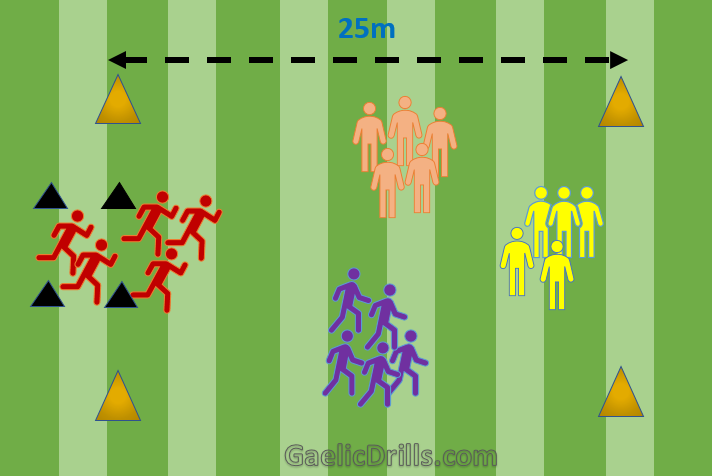
Drill Instructions:
- Split the large group into 4 teams of 5 or 6 and get a different colour set of bibs for each.
- Start off with calling one of the teams for example red to be team frogs and their job is to catch as many flies as they can within 40 seconds.
- Once caught, the flies must return to the fly pit and the mentor should count how many flies they catch within that time period.
- Next get the next coloured team to be the frogs and do the same for them and keep count of how many they have caught.
- Once the 4 teams have played the part of the frogs, reward the team that caught the most flies. This exercise warm up drill will get everyone pumped up and ready for the training session ahead.

Warm up Drill Option 3 – Bib Tail Tags
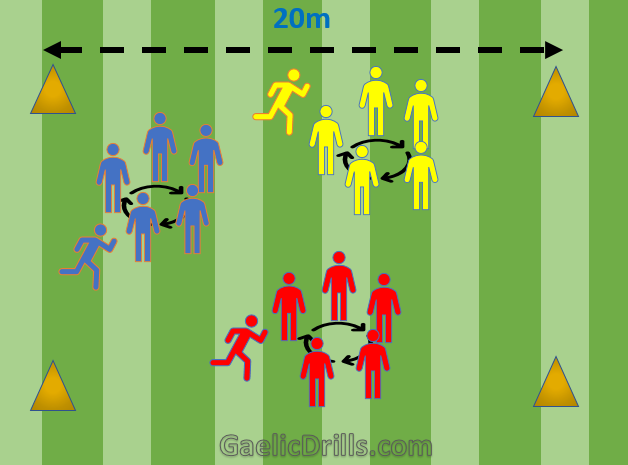
Drill Instructions:
- Split the larger group into smaller groups of 6 and have 5 of them hold hands in a circle as outlined in the image above.
- The first child or nominated child tucks their bib tails in their shorts/jersey and they keep moving around in circles trying to avoid the outer 6th person from taking the bib tail out.
- Next the outer 6th child needs to keep chasing them while they hold their hands and keep a time tracker of how quickly it can be done.
- Then rotate the players after a few minutes with the bib tails and the outer 6th child. The child that can get the bib tail removed the quickest is the winner of the game.
Read also: Our equipment list for drills here
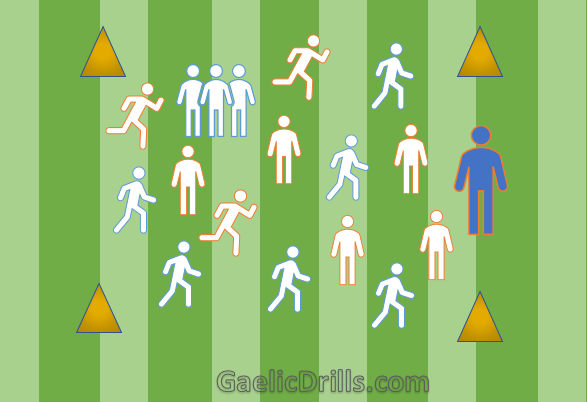
Warm up Drill Option 4 – Cat and Mouse Catch
Drill Instructions:
- For this warm up drill option, set up 4 separate mini dens for the mice approx. 3m by 3m in size.
- Nominate 4 or 5 cats with footballs and give them a red coloured bib, everyone else is split up equally into each of the 4 dens.
- Once the coach blows the whistle, the mice in each den must travel from one den to another den and it can be in any direction as long as they reach another den.
- While travelling to the next den, the cats then try to tag them with the ball and then they stay in the tagged area on the outer perimeter.
- The cats can work as teams to corner others and they should be alternated after a few minutes to give them a break.
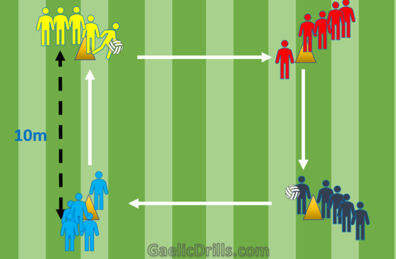
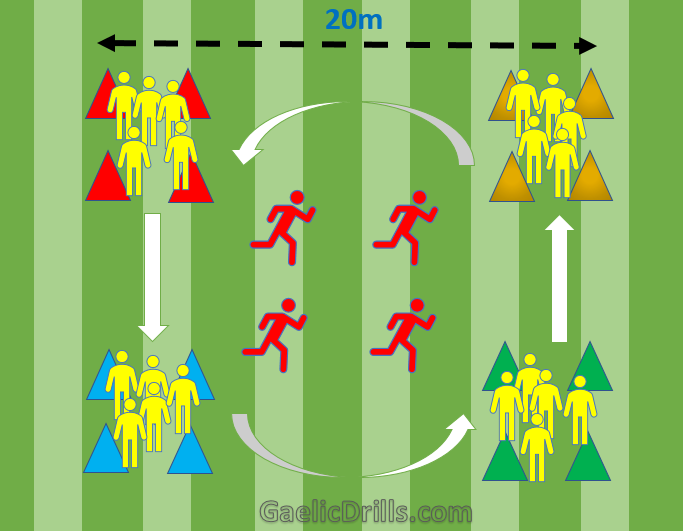
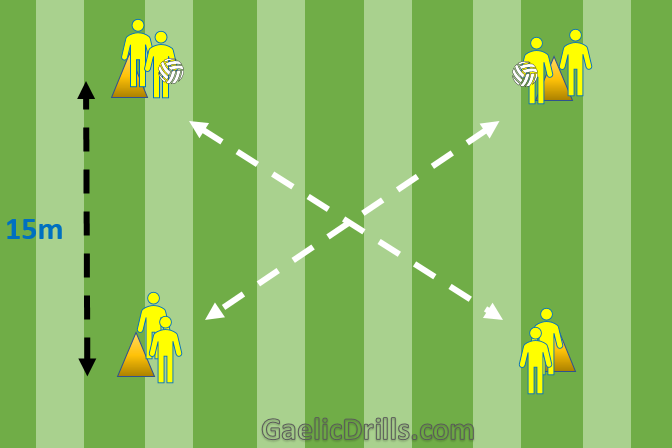
Warm up Drill Option 5 – Square Hand Passing
Drill Instructions:
- Split up the large group into 4 smaller groups and assign one group to each corner cone and get each team to put on their own coloured bibs
- The first child in 2 groups has a ball and when the coach blows the whistle, they run to hand pass or throw the ball to the next team as outlined in the diagram above.
- With this drill, there will be 2 balls being rotated at the same time so try to keep them at a steady pace instead of overtaking each other.
- Keep the rotation going until all players have left their original position and returned back to the position from which they started.
- When they start getting more confident with this drill, get them to change directions midway through the drill or introduce bounces or a 3rd ball
Drill Station Option 1 – Diagonal Hand Passing
Drill Instructions:
- A nice and simple drill for them is to set up 6 or 7 cones diagonally as outlined in the diagram and get them to practice a diagonal throw or hand pass to their team mates.
- The ball starts at the first member, it is passed diagonally to each member until it gets to the end and then the last player brings the ball back to the start once again (players stay in their positions)
- This will help with ball catching when the ball is coming from the side rather than straight in front of them as they need to pass the ball in a different direction from which they received the ball.
- After a few minutes, get them to speed up the process and also introduce a second ball to make it more challenging for them.
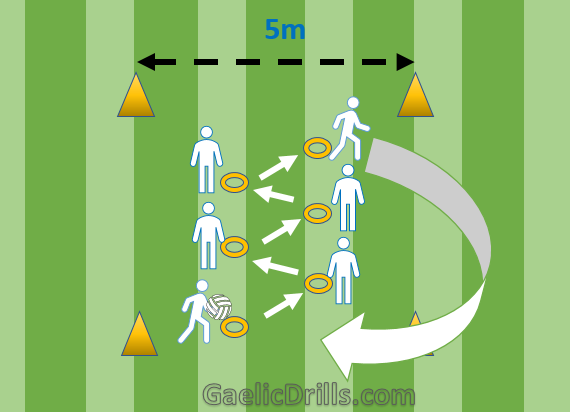
Drill Station Option 2 – Hand Pass Line Builder
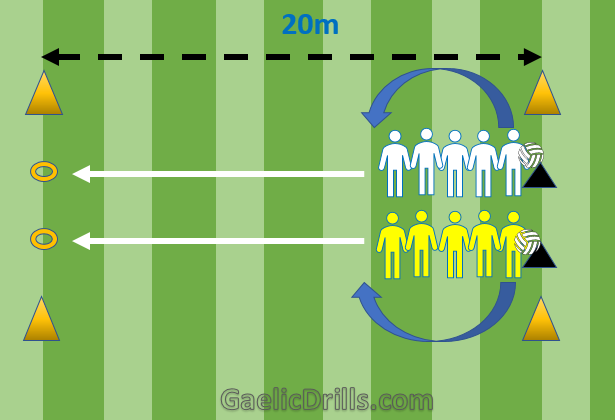
Drill Instruction:
- For a smaller area of 10m by 20m, line up 2 teams in the middle marker cones and get them standing side by side or shoulder to shoulder.
- The skill we want to develop here is quick hand-passing and quick movements. Once the first player passes the ball, they move to the left of the line and the same goes for the next member until the reach the finish line.
- This drill is all about movement once the pass is given so emphasis should be placed on quick feet as soon as the quick hand-pass is given.
- After a few minutes, get them to face the opposite way and get them to hand pass with their weaker hands.
Drill Station Option 3 – Ball Changing Sides
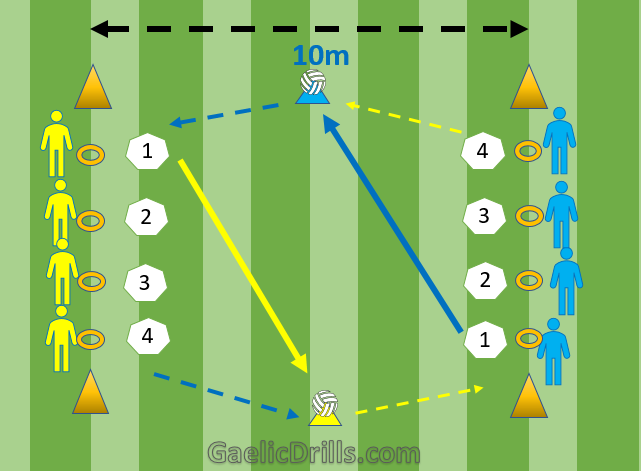
Drill Instructions:
- For this drill, set up 3 versus 3 or 4 versus 4 and line them up as outlined in the diagram. Each player is assigned a number and have them named in one direction on the first line and the opposite direction on the second line.
- Once the coach calls the number, for example 1 – then the 1’s from both teams need to collect the ball at their colour coded cones which should be the same as their bibs if possible
- They bounce and weave through the players on the opposite side and place the ball on the opposite side from where the ball was collected.
- Each of the named numbers should get to do this 3 times each where they should complete the tasks of picking and travelling with the ball at full speed.
- Points are awarded to the ones to return to their original position first.
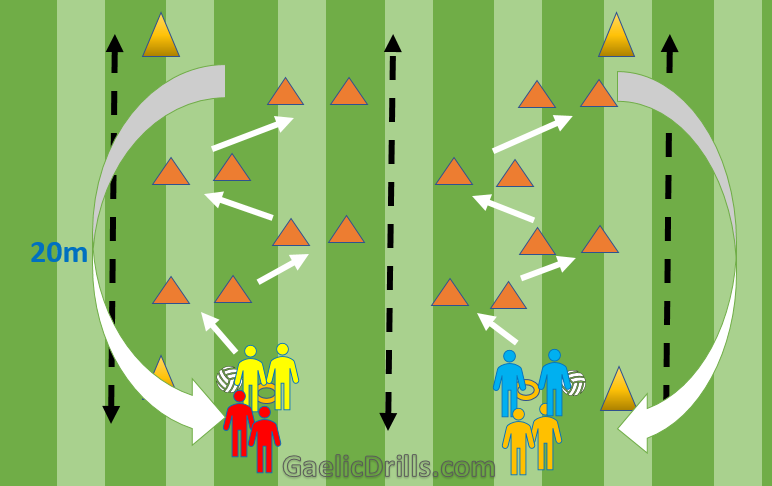
Drill Station Option 4 – Target Shooting Practice
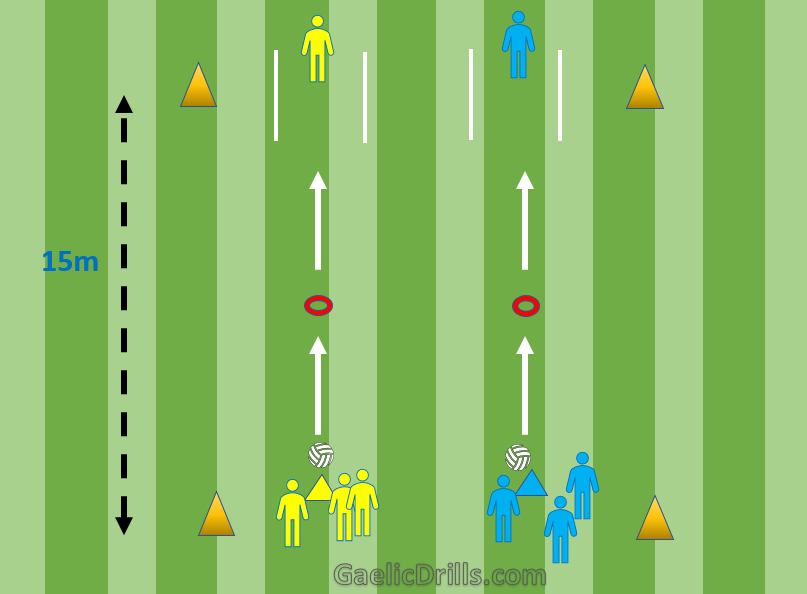
Drill Instruction:
- For this drill, split them up into small groups of 3 or 4 and position 3 of them behind the cones and 1 behind the goal poles.
- The first member travels with the ball from the first cone to the second cone using a bounce and a solo and kicks the ball when they reach the second set of red cones through the poles.
- Kicks should be attempted while they are moving or jogging rather than a stationary position and points should be awarded for those who manage a score.
- The player behind the goal retrieves the kicked ball and returns to the start position and the child who has kicked the ball goes behind the mini goals as the next retriever.
- Introduce ground kicking, punt kicking and also get them to try their weaker foot during this drill
Read also: Our equipment support list for Gaelic football here
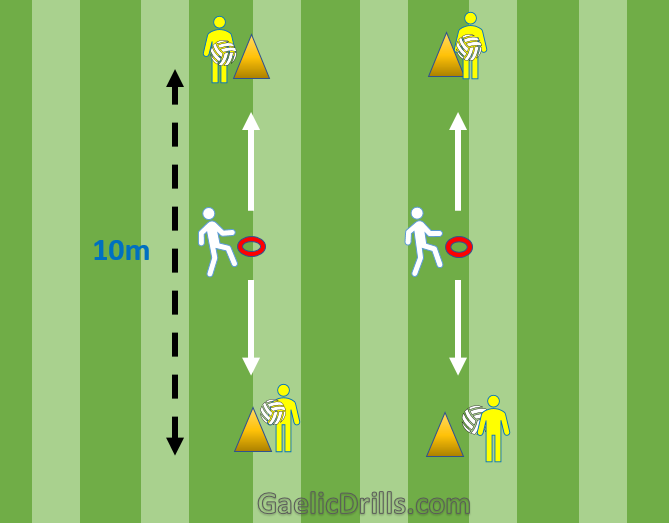
Drill Station Option 5 – Mini Rounder Kicks
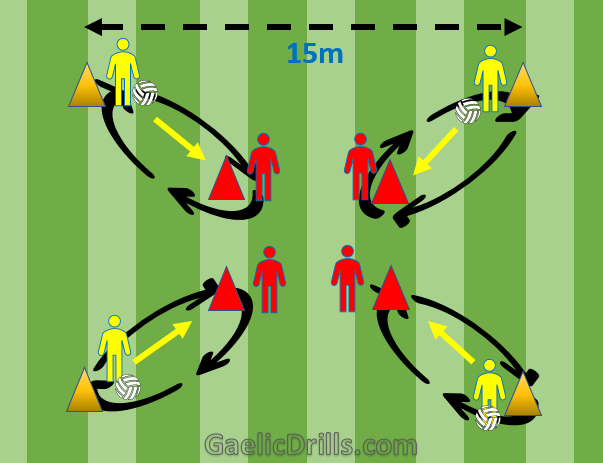
Drill Instructions:
- Another drill that you can try out is mini rounder kicks and split up the groups into 8 – 4 with yellow bibs and 4 with red bibs.
- The child in the yellow bib hand passes the ball to the child in the red bib and then the red bib can kick the ball as far as they can in any direction they want and as hard as they can.
- Once kicked, they start to run around the cones in a loop (as outlined in the arrows in the diagram) trying to get as many rounders as they can before the yellow bib returns the ball to the outer yellow cone again.
- Each person gets a go 3 times and then alternate the red and yellow bib positions. Keep a tally of how many rounders are completed to see who has won the game
Drill Station Option 6 – Trio Hand Passing
Drill Instruction:
- For this next drill you split them into smaller groups of 3 and have 1 child positioned at each cone.
- The children on the outer cone each have footballs while the child in the middle will be the runner. The child at the middle cone runs to the top cone and takes a pass and returns the pass.
- Once complete, the child changes direction to the cone behind them and takes a hand pass and gives a return hand pass.
- Let this hand passing drill run for 1 minute and then alternate the middle runner until all 3 have performed the task. Players should be encouraged to pass with the good hand to one cone and the weaker hand at the second cone.
Drill Station Option 7 – Pass Interceptors
Drill Instructions:
- For this drill, split them up into groups of 5 and have 4 of them positioned on the outer cones as outlined in the diagram.
- You will need 1 ball starting off and the aim for them is to complete the pass to another cone without the ball being intercepted.
- After a few minutes introduce a second ball and give them a maximum time limit on the ball of 3 seconds for a pass to be given. Alternatively, you can add a second child in the middle so there will be 4 children passing while 2 are trying to intercept the pass.
- This will motivate them to give accurate passes and to catch the ball securely for incoming passes.
Drill Station Option 8 – Hand Passing through Cones
Drill Instruction:
- This drill will require the children to be split into pairs and they will need to hand pass to each other through the various cones which will be positioned in a zig zag outline.
- Once they reach the final cone, then they can walk back to the start position once again. The next time they go switch the person on the left to the right and vice versa so that both hands can be used during this drill
- Once the confidence starts to grow, then put them into groups of 3 where the 3 of them need to navigate through the cones while hand passing to each other at the same time.
- Introduce a bounce also between the hand-pass after a few turns to change it up a bit. (apologies for all the arrows in this diagram but I hope it makes sense!)
Read also: Our equipment support list for Gaelic football
Drill Station Option 9 – Cross Kick Passing
Drill Instructions:
- Once you have the small groups split out into their various stations, have a maximum of 8 children for this drill where 2 children are on each cone
- The focus on this drill is to give an accurate cross kick pass to other members in a diagonal direction while the other team are kicking diagonally also.
- Each child takes turns and stays at their cones. Focus should also be put on catching the ball and securing it into the tummy area.
- After a few turns, get them to use the weaker foot and also get them to rotate to another corner cone.
- To get them motivated, give them a rating out of 10 for the best kick passing during this drill. If distance is a problem initially, get them to take 4 steps, a bounce and then a punt kick.
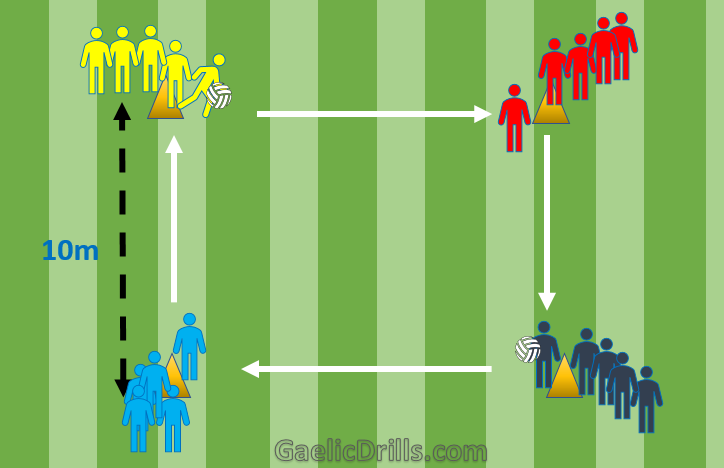
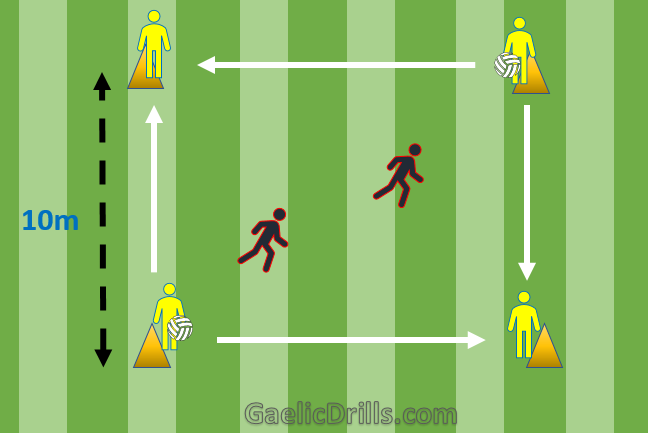
Drill Station Option 10 – Passing & Shooting Combo
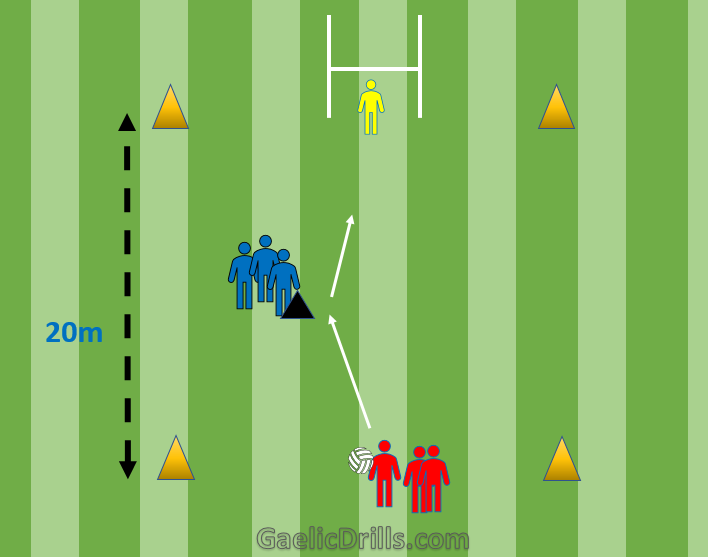
Drill Instruction:
- Ideally have 7 or 8 players for this mini drill and set up a small goals and cones approx. 10m apart – a total of 20m in length from the start to the goal line
- Players in red start with a bounce and then passes it to the blue player, takes a return pass, takes another bounce and then takes a shot on goal.
- One player remains beside or behind the goal to act as the retriever. Emphasis should be placed on technique rather than speed to get the bounce and pass done correctly and to take the hand-pass return securely before taking another bounce.
- Once the final bounce is taken, they can go for a goal or a point and the retriever should be rotated every 2 or 3 minutes.
- Likewise, the kickers and the hand passers should be rotated after 5 minutes or so.
Read also: Our equipment list for Gaelic football here
Section 3: Match Play Planning
For the final 25 to 30 minutes or so, get 2 small pitches organised and split out 4 teams as fairly as you can. Assign a set of bibs for each team and plan on having 2 games being played simultaneously side by side. After approx. 10 minutes, switch and alternate the teams so that they get the opportunity to compete against other players in the panel and focus on the drills which was practiced earlier during the session.
Educate others in the Gaelic Community?
How about you – did you find this list of U8 and U10 Gaelic football drills useful or helpful in any way? Are there other drills that you believe work better for your own groups that you would recommend instead?
If possible – please share your own suggestions or feedback in the comment box section provided below – so that others across the Gaelic Football community can learn also! (email addresses are not published)

The amount of football drills and detail about each of them is very impressive. My kids are trying out Gaelic football and overall I found this article easy to read and understand as I don’t have a lot of experience with these Gaelic games. Not too many websites provide this much detail and illustrations. The illustrations in themselves allow me to follow the drills so I can have some level of idea of what is being done should I be called to step in which is looking highly likely at the moment. In the current pandemic, too many people are nervous about group training so I am also thinking about working on drills at home alone for the potential future. Thank you for helping me out in getting a better understanding about this sport and the drills that can be done
You are more and welcome and many thanks for taking the time to stop by and leave your feedback – it is greatly appreciated!