Hello once again and many thanks for taking the time to visit our Gaelic Football drills for U6’s which we hope will benefit you and your panels in some small way. Managing a large group of U6’s is not an easy task so the more time you spend planning for the training session in advance the better and we hope this post can give you some direction on how the session should be laid out and managed. Having sufficient support for larger groups is hugely important and you should try to have 2 mentors for each group of around 10 children if at all possible.
Overview of Gaelic Football Sessions for U6’s
For the U6 age group, the training session can be split up in separate sections for easier management and always try to keep an eye on the time so that each part of the session can get enough coverage rather than rushing through some of the drills. Starting out, you can have a 10-minute warm up exercise routine for everyone and then split the larger group into smaller groups of 10 or less on average and have 2 mentors per group.
Before the session, you should set up 4 separate stations based on the number of groups you have so that 1 station will be covered by each group. Plan then on 30 to 35 minutes skill teaching drills in these stations and rotate every 8 to 10 minutes. Once these drills are complete, then finish up with 15 to 20 minutes of match play and split into 4 teams where necessary if the numbers are too large.
Gaelic Football Drills for U6 Content
- Section 1: Warm Up Drills for the entire group - 5 options
- Section 2: Practice Drills when split into smaller groups – 10 Options
- Section 3: Match play planning
Read also: Our recommended list of Equipment here
Section 1: Gaelic Football Warm up Drills for U6
Warm up Drill Option 1 – Relay Cones
Drill Instructions
- Split the large group into groups of 5 or 6 behind each of the cones
- Get them to carry the ball around the first cone and roll it to the next team member to be picked up
- Then get them to practice bouncing the ball through the first and second cones and then pass the ball to the next member
- Alternate with going forward, going backwards and sideways after a few minutes
- Children can bounce the ball to the first cone, roll it to the second cone, then pick the ball up, bounce it again on the return cone and kick pass on the ground or from the hands at the second cone to the next team member
- Alternate with rolling to the first cone and then pick the ball up, roll again to the second cone and pick up again and then return the ball with a kick pass or a rolling ball pass
Warm up Drill Option 2 – More Relay Cones
Drill Instructions
- Split into smaller groups of 5 behind each cone and put a player on each on the smaller marker cones.
- Players start with the ball, bounce it once and then roll the ball through the legs of the first stationary person, pick it up and then hand passes or throws the ball to the second stationary player and takes a return pass.
- Once the return hand pass or throw is taken, they return towards the group and then rolls the ball under the first stationary player for a second time.
- Then once rolled through the legs, they kick the ball on the ground to the rest of the team members.
- Stationary players at the marker cones need to be changed every few minutes.
- This exercise will develop passing skills, rolling, picking up, ball handling and kicking the ball from the ground
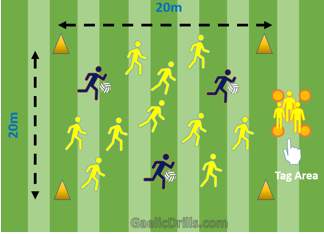
Warm up Drill Option 3 – Tag Football
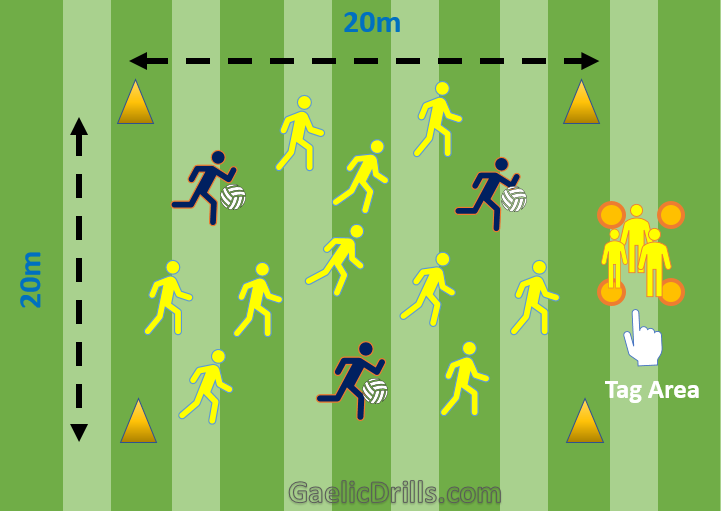
Drill Instructions
- Set out an area of 20 meters by 20 meters with 4 large cones and also set up a small tag area outside the perimeter for people who have been tagged.
- Nominate 3 players with footballs and bibs and they must tag as many people as they can with the football. Once tagged, they leave the main area to the tag area.
- People can only be tagged by people who have the ball in hand as throwing the ball at people does not qualify.
- Allow the 3 players to tag as many as they can in 1 minute, give a break for a minute and then alternate the taggers.
- Also allow this exercise to run for 10 minutes and try to have as many people participate as taggers as you can.
Instead of using a tag area, the tagged person can also stand straight with arms up and legs apart and someone else must run under their legs to release them as a 2nd option.
Read also: Our list of Support Equipment here
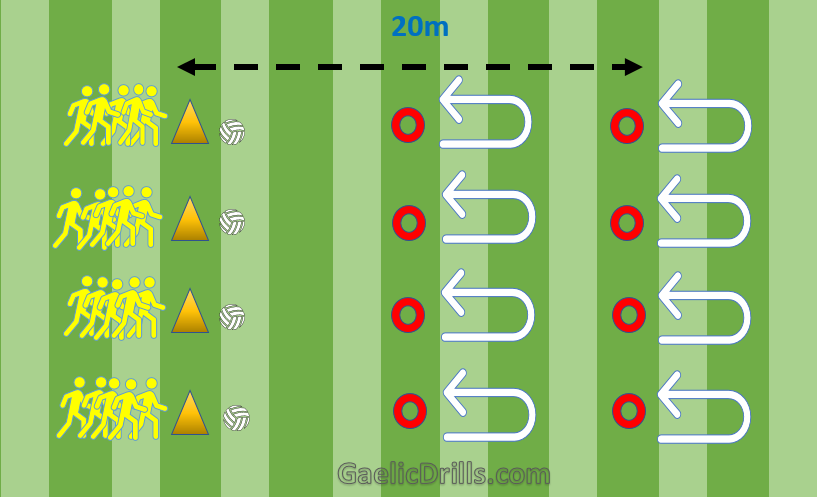
Warm up Drill Option 4 – Ball Balancing
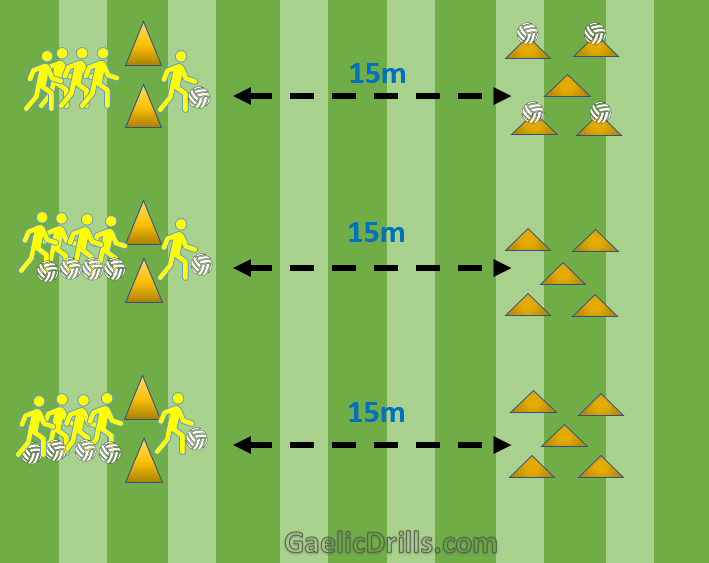
Drill Instructions
- Split into groups of 5 or 6 and line them up between the large cones.
- Space out 5 cones 15 meters away as outlined in the diagram. Use the space marker cones as these allow the balls to be balanced a lot easier.
- The aim is to get all 5 balls balanced on the 5 cones and only 1 person can go at a time. The second person can only go once the first person has returned to base and so forth.
- Introduce ball bouncing during this exercise on their way to balancing the balls on the cones
- The team with all their 5 cones balanced and all the players back to base is the winner of the competition.
- Another way is to have the balls already balanced on the cones and they need to collect them one by one and bouncing the ball and dribbling the ball on the way back.
- A large stock of footballs will be needed for this exercise. If you have limited stock, then reduce group sizes and cones.
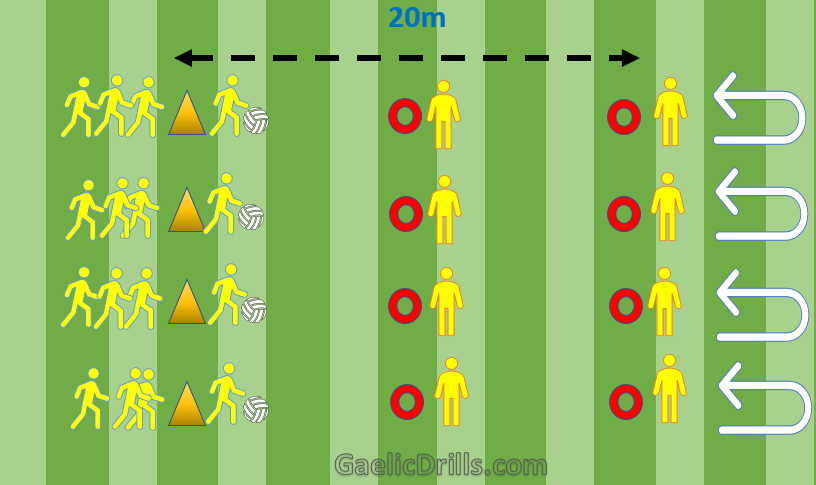
Warm up Drill Option 5 – Caterpillar Building
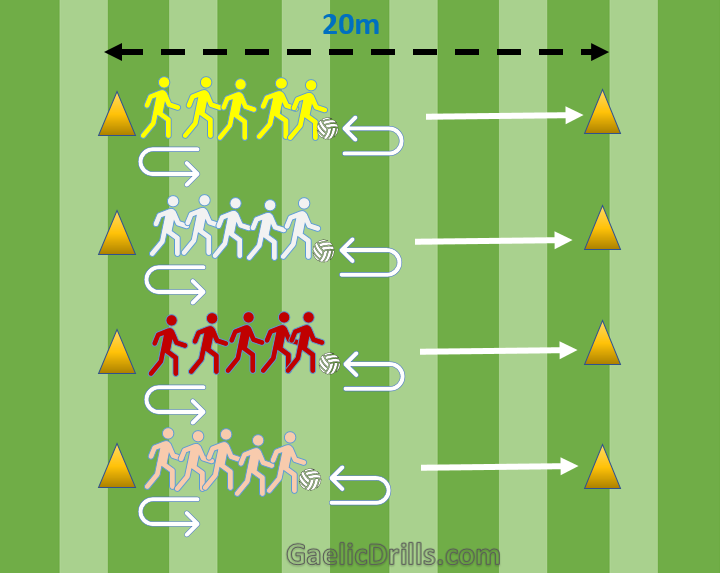
Drill Instructions
- Split the large group into smaller groups of 5 and line them up in a straight line as outlined in the diagram.
- The purpose of this drill is to move like a Caterpillar. The child at the front has to roll the ball under the legs of all the players behind them. Once the ball is rolled all the way to the back, then the last person at the back brings the ball forward to the front.
- Now the process is repeated again and the ball needs to be rolled all the way to the back and again the person at the end moves to the front of the line.
- The team to reach the other cone 20m away wins the competition. This exercise helps to improve ball handling in a more difficult situation and to control the ball with the hands and having to grab and roll several times.
- Also introduce bouncing of the ball as the child at the end of the line moves to the front of the line. Alternatively, instead of rolling the ball through the legs, you can get them to throw the ball over each of their heads until the ball has reached the end of the team line.
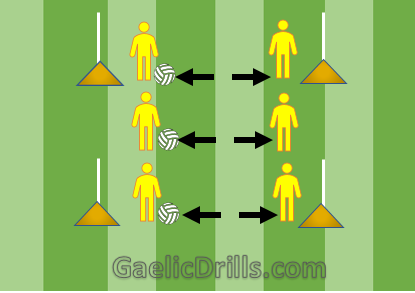
Practice Station Option 1 – Close by Passing
Drill Instruction:
- Set out a smaller area of 10m by 10m with one of the smaller groups – ideally 6 to 8 players
- The focus on this drill is close person passing. You can start with throwing the ball to each other and then to hand passing to each other. After a few minutes, then change it to a knee punt pass, a dribble pass on the ground and also a small punt kick pass.
- This exercise gets them practicing ball handling skills, passing, catching, accuracy, foot work and keep a timer to move them to the next station after approx. 8 minutes
Practice Station Option 2 – Catching Skills
Drill Instruction:
- The main points here to work on is the quality of the catch and bringing the ball close to the body into the tummy region
- Split them into pairs or in three’s and get them to throw or hand pass the ball to each other within the small group.
- Passes to each other should be alternated be it a high pass, a low pass or a body pass with the end result always being the same where the ball is tucked & wrapped into the tummy region
- Start with 1 meter apart and then change to 2 meters apart after a few minutes
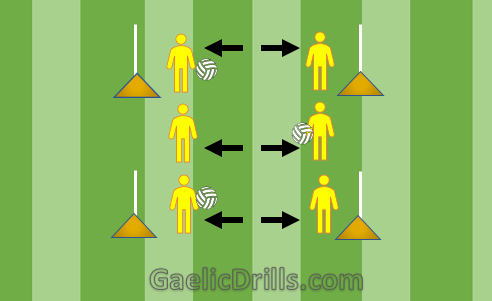
Practice Station Option 3 – Ground Kick Passing
Drill Instruction:
- This drill is designed to develop the control of the ball with the foot and passing the ball with the foot along the ground
- Emphasis should be placed on kicking the ball on the inside of the foot and controlling the ball by trapping with the under foot
- After a few minutes, change them to the other foot so that the skill can be developed on both feet at the same time.
- Start with 2 meters apart and then extend it to 4 meters apart to give them an understanding how hard the ball needs to be kicked to reach its final destination
Practice Station Option 4 – Ball Pick Ups
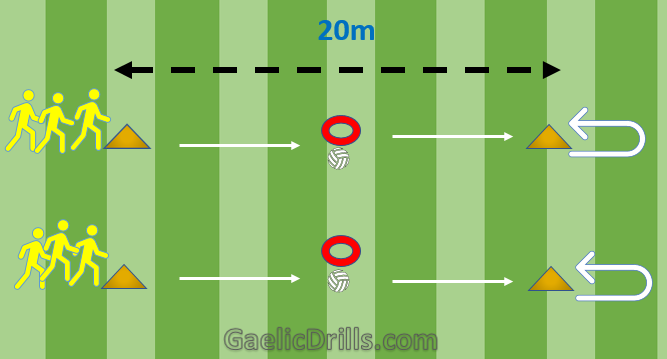
Drill Instruction:
- This drill is to show them how the football should be correctly picked up from the ground.
- Line up 3 players behind the cones, they run to the middle cone to pick up the ball, run around the second cone, take a ball bounce and then leave the ball back to the original position.
- Once the player has reached the base, then the second player follows with the same drill. The first team back that have picked up the balls correctly and returned to base will win the competition.
- After a few minutes, alternate it that when they reach the far cone, instead of bouncing, they roll the ball back to the original position.
Read also: Our recommended Equipment list here
Practice Station Option 5 – Ball Bowling
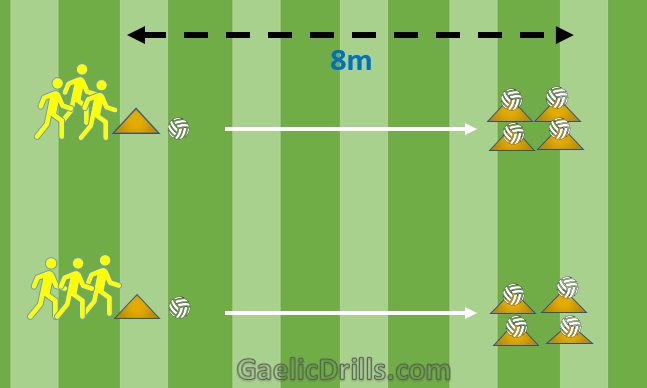
Drill Instruction:
- The main skill to develop here is the accuracy of the kicking from the ground.
- Choose a smaller station of 8m by 10m and try to work off groups of 4 to avoid them waiting around for long periods.
- The focus of the game is to try to knock over as many of the balls from the cones as they can with 3 kicks. Once 3 kicks are taken, then the next person has their turn – keep tabs on how many each of them can knock off the cones
- One child then acts as the Bowler Fixer by placing the balls back onto the cones when they have been knocked over.
Practice Station Option 6 – Shooting Drill
Drill Instruction:
- Set up an area 10m by 10m again and place 4 cones 10m apart as outlined in the diagram.
- Then place 2 larger cones in the centre to act as goal targets or mini goals. Larger length poles can be used instead of the larger cones if you have them available.
- Players stand either side and try to kick the ball through the cones or long length poles and each child should have time to take enough attempts.
- As the ball comes through the cones, the members on the other side have to try to control and stop the ball with their feet. Alternate between left and right feet after a few minutes
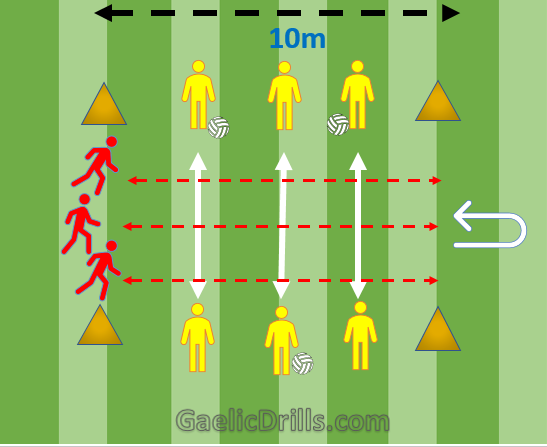
Practice Station Option 7 – Ball Bouncing Skill

Drill Instruction:
- The focus on this drill is to teach them how to bounce the ball using both hands while walking and being able to catch it as it bounces up and then they must wrap the ball into their tummy.
- Split into 3 small groups of 3 or 4 and get them to walk to the cones just bouncing the ball a few times and then return the ball to the next member.
- As the bouncing starts to improve, gradually progress the walk and bounce to a jog and bounce and furthermore to a race and bounce after a few sessions once the confidence starts to grow.
- Also introduce a left to right movement where they must bounce to the left and bounce to the right
Read also: Our secondary list of equipment resources here
Practice Station Option 8 – Penalty Kicking
Drill Instruction:
- If you have a small number of 4 or 5 then stick to just one goal but if you have more, you are better off setting up a second goals close by as outlined in the diagram.
- Set up the goals 5 to 8m apart and use the long length poles if possible or larger taller coloured cones.
- Allow the drill to run for 5 to 8 minutes and make sure to switch the goalkeeper every few minutes and also get the children to take as many shots with their weaker foot as their stronger foot.
- The goalkeeper should then practice the return pass using a kick punt pass from the hands.
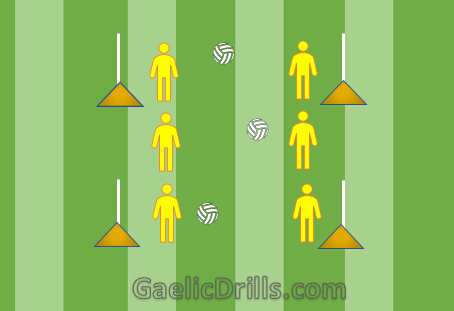
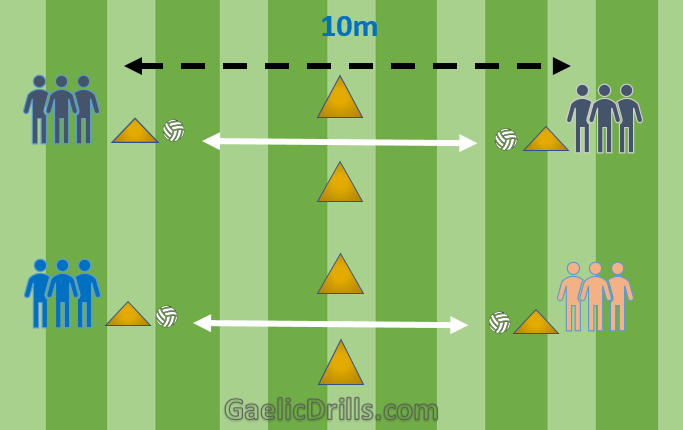
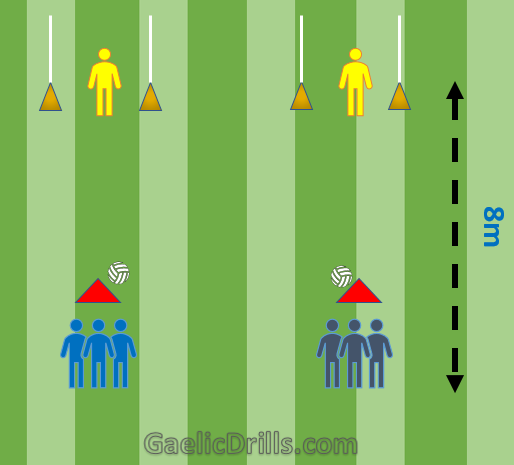
Practice Station Option 9 – Roller Targeting
Drill Instruction:
- This exercise is to improve the ball handling, ball rolling, ball control and ball catching.
- The yellow team function is to roll the ball over and back and over and back to each other trying to get the balls to touch the red team running across.
- Alternative the 3 red runners every few minutes to give them a break.
- Players rolling the ball need to practice using both hand rolling and also rolling with their left hands and also their right hands.
- Avoid kicking or throwing the ball with force as the ball needs to be rolled in a straight line as much as possible to opposite members.
Practice Station Option 10 – Goal Shooting
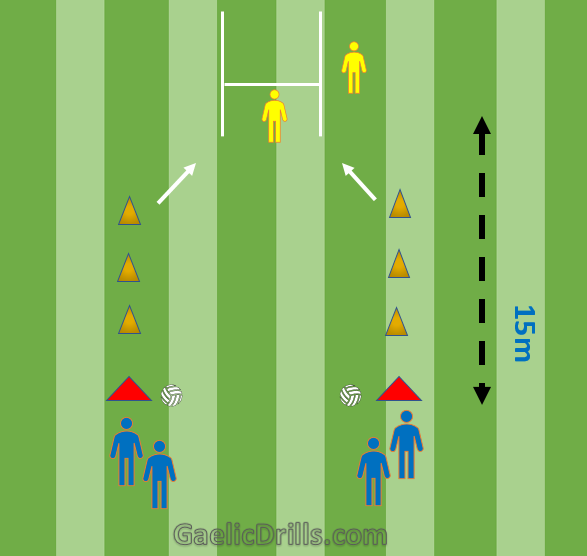
Drill Instruction:
- This drill is to introduce the concept of shooting on goal so set up the cones and the goals as outlined in the diagram around 15 to 20m in length
- Players must zig zag through the cones and hop the ball at the same time and a solo kick for those who are able to do it
- Once through the final cone, then they take a shot on goal be it a goal or a point. One player at the rear is the retriever to send the balls back and they should be alternated every few minutes.
- Likewise, alternate the goalkeeper after a few minutes and ask the players to try using both their left and their right feet.
Read also: Equipment resources to support drills here
Section 3: Match Play
The main emphasis of match play is to get as many of them participating in the game as possible, so it is important to split them into smaller groups again. Set up 2 small pitches and also set up 4 teams each wearing different coloured bibs. Start off with a 10-minute game and then alternate the sides for a second game of 10 minutes. Once the warm-up session, the station drill sessions and the 2 mini match plays are complete, you will do well to have all of this done in 60 minutes or so.
Feedback or Educate Others?
How about you – did you find this Gaelic football drill list helpful in any way? Are there other drills that work better for your own groups that you would recommend instead?
If possible – please share your own suggestions or feedback in the comment box section provided below – so that others across the Gaelic Football community can learn also! (email addresses are not published)

There are some really good drills here for Gaelic Football. I am a bit of a novice at coaching the local GAA underage teams so I was looking for a bit of help online when I came across this list. Its greats to be able to read it more clearly that some of the PDF attachments that you have do download and some of these are hard to manage on mobile devices. Videos are great also but you have to spend loads to time searching and viewing drills to try to pick one that you can manage with your own group so this list has certainly benefited me in a big big way so thanks for sharing these drills in an easy to follow manner. Thanks again for the info here – one question – have you got any drills yet for older groups???
Hi there, this website is still relatively new and more drills for older groups will be added in the coming weeks. Many thanks for taking the time to stop by and leaving your feedback – it is greatly appreciated!